| 일 | 월 | 화 | 수 | 목 | 금 | 토 |
|---|---|---|---|---|---|---|
| 1 | 2 | 3 | 4 | 5 | 6 | 7 |
| 8 | 9 | 10 | 11 | 12 | 13 | 14 |
| 15 | 16 | 17 | 18 | 19 | 20 | 21 |
| 22 | 23 | 24 | 25 | 26 | 27 | 28 |
- heap
- Algorithm
- Python
- github personal access token
- codingtest
- Java
- 네트워크와 분산 시스템
- 요리책 운영체제
- 브라우저 JSON 인코딩
- 문제 풀이
- GCP PubSub
- 물리 메모리 관리
- 가상 메모리 기초
- 코딩테스트
- CloudFunction
- 연습문제
- github access token
- CPU 스케줄링
- 브라우저 JSON encoding
- 운영체제
- 요리책
- 스프링 APPLICATION_JSON_UTF8
- chapter7
- github 403
- github push 403
- chapter8
- JSON UTF-8
- JSON encoding
- PubSub
- 알고리즘
- Today
- Total
이도(李裪)
이미지 리사이즈 CloudFront + Lambda@Edge 본문
실시간(On the fly) 이미지 리사이즈 서비스
파라미터로 이미지 url 주면 이미지를 특정 사이즈로 리사이즈 하는 서비스입니다
Route53(DNS) + Cloudfront(CDN) + S3(storage) + Lambda@Edge 로 구성하였습니다
당근마켓에서도 해당 서비스를 만들었고 검색하면 비슷한 블로그가 많이 나옵니다. AWS 공식 블로그에도 해당 기술스택으로 image resize 하는 내용이 있습니다
(그런데 Node 버전이 낮아서 에러가 있습니다 그래서 시행착오 내용을 기록으로 남기고자 합니다)
당근마켓: https://medium.com/daangn/lambda-edge로-구현하는-on-the-fly-이미지-리사이징-f4e5052d49f3
필요성
기존에는 Lambda Runtime으로 Node.js 10 버전을 사용하고 있었습니다
하지만 지원기간이 만료되면서 Node 12 또는 14로 migration을 해야했습니다
작성하는 시점(2021.07.09)에서는 Node 16이 latest LTS 이고 Lambda에서는 Node 10, 12, 14가 가능했습니다. Node 14로 migration 했습니다.
Lambda Runtime support policy
In Phase1, no longer security patches or other updates
In Phase2, no longer create or update functions
Lambda does not block invocations of functions that use deprecated runtime versions. Function invocations continue indefinitely after the runtime version reaches end of support. However, AWS strongly recommends that you migrate functions to a supported runtime version so that you continue to receive security patches and remain eligible for technical support.
→ 사용을 막지는 않지만 security patch나 지원을 못 받는다 (코드는 계속 최신화 시키는 게 미덕이다)

AWS Lambda - Deployment Package
Deployment Package는 실행할 코드와 dependencies를 컨테이너 이미지(ECR에 올리면 됩니다)나 .zip 파일 모아놓은 것입니다.
저는 .zip 파일로 deployment package를 만들었습니다. dependencies(querystring, request, sharp)가 있는 node_modules과 실행파일 (index.js)을 .zip로 만들었습니다
.zip 파일을 만들기 위한 여정

- AWS Lambda와 같은 환경 (Amazon Linux 2)에서 node dependencies를 만들기 위해서 Docker를 사용해서 빌드를 했습니다
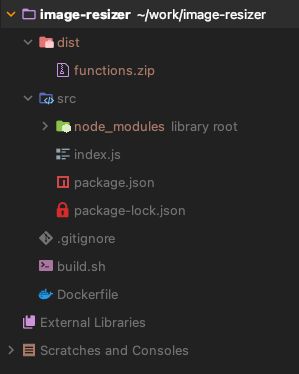
- Docker로 빌드해서 생긴 파일들 (dependencies) —volume 옵션으로 로컬과 연결시켜 그 파일들을 압축하는 과정입니다
[Trouble shooting] Sharp 설치과정에서 에러가 발생합니다

sharp: Installation error: Use with glibc 2.26 requires manual installation of libvips >= 8.10.6
라는 에러가 발생합니다
에러의 원인은 Amazon Linux 2의 GNU C Library (glibc)의 버전은 2.26 입니다
하지만 Prebuilt binary를 설치할 때 요구하는 glibc의 최소 버전은 2.29 입니다
도커 이미지에 설치된 glibc 버전이 sharp에서 요구하는 glibc 최소 버전을 충족시키지 못해서 나는 에러입니다


[Trouble Shooting (cont.)] Sharp 설치 과정 문제 해결
Sharp 공식문서에는 Cross-platform 설치가 있습니다
문서에서 설명하듯이 platform, architecture, arm-version을 설정할 수 있습니다
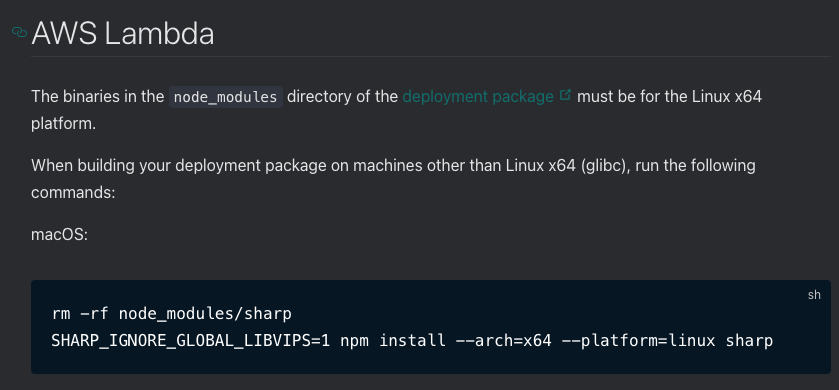
좀 더 밑에 보니 AWS Lambda의 환경에 맞는 설치 방법도 있습니다
설치가 되어있다면 설치된 Sharp 라이브러리를 삭제하고 x64 아키텍처의 linux 플랫폼 Sharp를 설치하는 명령어 입니다
https://sharp.pixelplumbing.com/install#aws-lambda
sharp - High performance Node.js image processing
sharp.pixelplumbing.com
rm -rf node_modules/sharp
SHARP_IGNORE_GLOBAL_LIBVIPS=1 npm install --arch=x64 --platform=linux sharp

정리하면 Sharp 제외한 다른 라이브러리는 Docker에서 설치하고 Sharp는 Cross-Platform으로 설치하였습니다
사용하는 라이브러리 모두 Cross-Platform으로 설치하지 않은 이유는 향후에 Amazon Linux가 버전이 올라가면서 glibc 버전도 올라갈거라 생각했고 그 때는 Docker로 다 설치하는 게 맞다고 생각했습니다. 지금처럼 Docker가 기본이고 어쩔 수 없는 경우에 한해서 Cross-Platform으로 설치하는 게 맞다고 생각했습니다
# Dockerfile
FROM amazonlinux:2

WORKDIR /tmp

RUN yum -y update
RUN yum -y install gcc-c++
RUN yum -y install findutils
RUN yum -y install tar gzip
RUN yum -y install glibc

RUN touch ~/.bashrc && chmod +x ~/.bashrc

RUN curl -o- https://raw.githubusercontent.com/nvm-sh/nvm/v0.38.0/install.sh | bash

# amazon linux support Node 14.x as the latest LST version (2021.07.09 Lee,YoungHoon)
RUN source ~/.bashrc && nvm install 14

WORKDIR /build
// src/index.js
'use strict';

const querystring = require('querystring');
const lrequest = require('request');
const sharp = require('sharp');

exports.handler = (event, context, callback) => {
    const {request, response} = event.Records[0].cf;

    let width = 1200;
    let height = 627;
    let url;

    // check if image is present and not cached.
    if (response.status !== 200) {
        const params = querystring.parse(request.querystring);
        // If none of the s variables is present, just pass the request
        if (!params.s) {
            callback(null, response);
            return;
        } else {
            url = params.s;
        }

        if (!params.w) width = params.w;
        if (!params.h) height = params.h;

        try {
            lrequest.get({
                url,
                encoding: null
            }, (error, resp, body) => {
                if (error) {
                    callback(null, response);
                    return;
                } else {
                    // If the file is Image
                    // And has to be resized
                    const image = sharp(body);
                    image.resize(width, height, {
                        fit: 'contain',
                        background: {r: 255, g: 255, b: 255, alpha: 1}
                    }).toBuffer().then((buffer) => {
                        responseUpdate(
                            200,
                            'OK',
                            buffer.toString('base64'),
                            [{key: 'Content-Type', value: resp.headers['content-type']}],
                            'base64'
                        );
                        response.headers['cache-control'] = [{key: 'cache-control', value: 'max-age=31536000'}];
                        return callback(null, response);
                    }).catch(error => {
                        console.error(error);
                    });

                }
            });
        } catch (err) {
            console.error(err);
            return callback(err);
        }

    } else {
        callback(null, response);
    }


    function responseUpdate(status, statusDescription, body, contentHeader, bodyEncoding = undefined) {
        response.status = status;
        response.statusDescription = statusDescription;
        response.body = body;
        response.headers['content-type'] = contentHeader;
        if (bodyEncoding) {
            response.bodyEncoding = bodyEncoding;
        }
    }
};
# build.sh
#!/bin/bash

# docker를 빌드
docker build -t amazon-nodejs .

# 빌드된 이미지로 sharp를 제외한 라이브러리 설치 (querystring, request)
# 빌드된 결과를 /src에 동기화하기 위해 --volume 옵션 사용
docker run --rm --volume ${PWD}/src:/build amazon-nodejs /bin/bash -c \
"source ~/.bashrc; npm init -f -y; npm install querystring --save; npm install request --save;npm install --only=prod"

# Corss-Platform 방법으로 Sharp를 설치
cd src
rm -rf node_modules/sharp
SHARP_IGNORE_GLOBAL_LIBVIPS=1 npm install --arch=x64 --platform=linux sharp

# Deployment Package로 .zip 파일로 만들기
zip -FS -q -r ../dist/functions.zip *
build.sh 파일을 실행하면 Docker를 빌드하고 라이브러리들을 설치하고 Deployment Package(.zip)를 /dist 폴더에 생성해줍니다
Cloudfront + Lambda@Edge
https://docs.amazonaws.cn/en_us/AmazonCloudFront/latest/DeveloperGuide/lambda-at-the-edge.html
Customizing at the edge with Lambda@Edge - Amazon CloudFront
Services or capabilities described in Amazon Web Services documentation might vary by Region. To see the differences applicable to the China Regions, see Getting Started with Amazon Web Services in China. Customizing at the edge with Lambda@Edge Lambda@Edg
docs.amazonaws.cn

[내용 정리]
Lambda@Edge는 Node.js와 Python으로 구성할 수 있는 Lambda function 입니다. Cloudfront의 요청을 받으면 function을 실행해서 request 또는 response를 customize 할 수 있습니다.
서버를 provisioning(띄우거나) & managing(관리)하지 않아도 되는 이점이 있어서 cloudfront + lambda@edge 조합이 좋습니다
좀 더 디테일하게 Lambda@Edge
https://docs.amazonaws.cn/en_us/AmazonCloudFront/latest/DeveloperGuide/lambda-at-the-edge.html
Customizing at the edge with Lambda@Edge - Amazon CloudFront
Services or capabilities described in Amazon Web Services documentation might vary by Region. To see the differences applicable to the China Regions, see Getting Started with Amazon Web Services in China. Customizing at the edge with Lambda@Edge Lambda@Edg
docs.amazonaws.cn
[내용 정리]
Node.js나 Python 함수로 만들 수 할 수 있고 region은 US East (N. Virginia)에서만 가능하다 (lambda 함수는 여기 리전에 배포하면 다른 리전으로 복제된다). 여러 리전으로 propagation 되기 때문에 request와 가까운 리전에서 요청을 받고 처리 할 수 있다. origin server까지 요청이 안 내려가기 때문에 latency가 크게 줄어 속도가 빠르다
Lambda@Edge event 구조 (index.js 코드 이해하는 데 도움이 됨)
https://docs.aws.amazon.com/ko_kr/AmazonCloudFront/latest/DeveloperGuide/lambda-event-structure.html
Lambda@Edge 이벤트 구조 - Amazon CloudFront
이 페이지에 작업이 필요하다는 점을 알려 주셔서 감사합니다. 실망시켜 드려 죄송합니다. 잠깐 시간을 내어 설명서를 향상시킬 수 있는 방법에 대해 말씀해 주십시오.
docs.aws.amazon.com
Lambda@Edge event 구조 (index.js 코드 이해하는 데 도움이 됨)
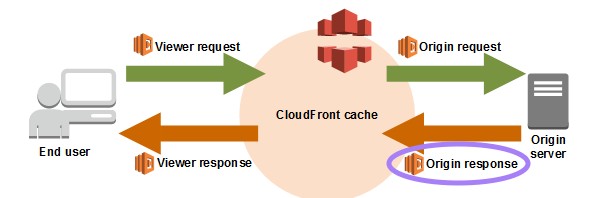
Lambda@Edge에서 Origin Response 부분을 수정합니다

Cloudfront에서 Origin Response 부분을 수정합니다.
S3에 파일을 따로 저장할 필요가 없고 실시간이 요청이 들어오면 그 부분을 응답해주는 방법을 사용했습니다. 이미지를 따로 저장하지 않는 것은 유즈케이스 때문입니다 (재사용할 필요가 없고 cloudfront에서 caching 해주는 정도로만 사용해도 충분해서 그렇습니다. s3에 저장할 필요가 있으면 당근마켓이나 AWS 공식 블로그의 코드를 참고해서 구현하시면 됩니다)
Cloudfront에서 S3에 해당 파일이 있는 확인한 후에 Origin Response를 보낼 때 해당 Lambda@Edge에서 node.js 코드로 해당 응답을 customize한 뒤에 응답하는 로직입니다
IAM Policy & Role
IAM Policy을 다음과 같이 설정합니다
{
    "Version": "2012-10-17",
    "Statement": [
        {
            "Sid": "sid1",
            "Effect": "Allow",
            "Action": [
                "iam:CreateServiceLinkedRole",
                "lambda:GetFunction",
                "lambda:EnableReplication",
                "cloudfront:UpdateDistribution",
                "s3:GetObject",
                "logs:CreateLogGroup",
                "logs:CreateLogStream",
                "logs:PutLogEvents",
                "logs:DescribeLogStreams"
            ],
            "Resource": "*"
        }
    ]
}
IAM Role에서 Lambda를 선택한 후 해당 policy를 연결시켜줍니다
살펴보면 Lambda Function이 사용자 (저)를 대신해 AWS services를 호출할 수 있는 설정이고
Lambda를 가져올 수 있고 Cloudfront, S3, logs 등을 설정할 수 있는 권한을 넣었습니다
Cloudfront 설정
요청이 들어오는 url을 파싱해서 source(s), width(w), height(h) 부분을 읽는 부분이 있습니다. 그래서 Query String을 포함해야 합니다.
Cloudfront > Behaviors > Edit 에서 수정할 수 있습니다

Query String을 포함할 때 특정 파라미터만 포함할 수도 있는데 편의를 위해서 저는 모든 파라미터를 포함하게 설정하였습니다. 그리고 밑에 caching 시간도 31536000 seconds (365 days) 로 기본 설정으로 두었습니다.
Origin Response를 해당 Lambda@Edge로 설정해줍니다

AWS Lambda@Edge Region
공식문서에서 나와있듯이 Lambda@Edge는 US-East1 (N.Virginia)에서만 가능합니다
S3는 어떤 Region으로 해도 괜찮습니다
(Seoul로 많이 하시는 데 저는 Cloudfront와 Lambda@Edge가 US-EAST-1에 있음을 분명히하기 위해서 Region을 통일시켰습니다)
Cloudfront는 Global Region으로 설정되어 있어서 기본값이 US-East1 (N.Virginia) 입니다
Lambda@Edge
IAM Role은 위에서 생성한 Role을 연결시켰습니다
Runtime을 Node.js 14.x (2021.07.09 기준 Node.js 최신 버전)으로 설정했습니다
생성한 Lambda에서 "Upload from"을 선택해서 ".zip file"을 누르고 앞에서 생성한 .zip을 선택합니다
우측 상단 "Actions" > Deploy to Lambda@Edge 를 클릭해서
아래의 이미지와 같이 해당 Cloudfront를 선택하고 event를 Origin response로 설정합니다

Versions 탭에서 확인하면 Lambda@Edge가 잘 배포된 것을 확인할 수 있습니다

Refer
'개발' 카테고리의 다른 글
| [알고리즘] 만들 수 없는 숫자 Python (6) | 2021.07.25 |
|---|---|
| [알고리즘] 무지의 먹방 라이브 Python (5) | 2021.07.25 |
| Cloudfront url 접속하면 S3 url로 리다이렉트되는 문제. Redirect CloudFront Url to S3 location problem (3) | 2021.06.09 |
| "실전! 스프링 부트와 JPA 활용1 - 웹 애플리케이션 개발" 나의 정리 (2) | 2021.06.08 |
| 익명 FTP 패시브 서버 설정. FTP server passive mode anonymous on AWS Ubuntu 20.04.2 (4) | 2021.05.15 |


